Neal Grosskopf
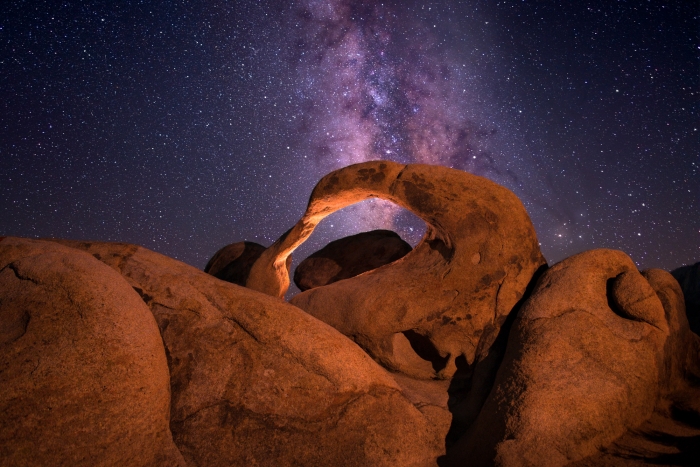
Mobius Arch – Alabama Hills, California
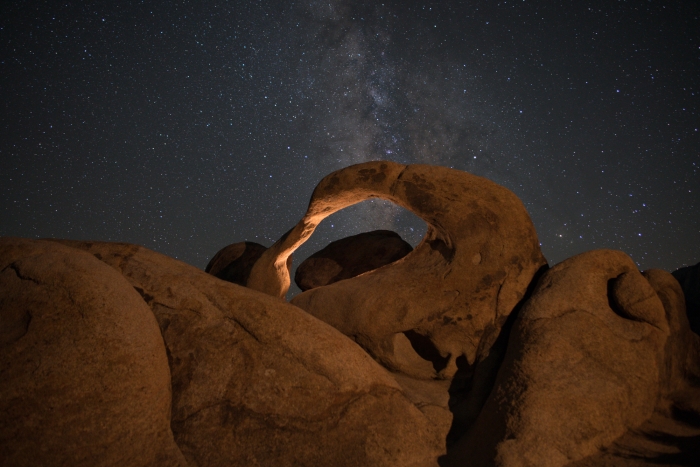
Before & After


I was fortunate during my visit to the Alabama Hills that the Milky Way lined up nicely inside Mobius Arch. As I was scouting it out during sunset I held my phone with the Photopills app up to the arch and was surprised that it would line up just after sunset that night. I ended up waiting there another two hours until it got dark just in case other photographers showed up. Unlike many of my other shots, this particular one I created a video editing series on how I made it step by step. Check that out here on Youtube – https://www.youtube.com/watch?v=mYnX9sc0AAw&index=1&list=PLUZk6cRYiDTOuQRFlKHvU-MN3v-HiO1UJ
Location
Mobius arch is located in the Alabama Hills region of California near Lone Pine. The park has been used as the movie set for many Hollywood movies due to its unique features and only being 3-4 hours from Los Angeles. Getting to the arch is pretty easy, in fact its exact location can be found on Google Maps. Once you get to the parking lot, take a left and follow a trail for roughly 100 yards and it’ll lead straight to the arch. At first you’ll see the backside of it opposite of what you see in my picture. Head down a hill and you can see this vantage point of it. During you visit make sure to check out all of the other arches at the park. I like to think of the Alabama Hills as sort of a mini Arches National Park minus all the crowds of people.
Composition
Like I mentioned early, I knew I wanted to shoot this arch, but I had no idea the Milky Way would line up with it so nicely. Most of the pictures I’ve seen of it online, the Milky Way is either to the left or right, but I haven’t seen any so far where it’s inside the arch which was something I was excited about. I visited it in mid September in case anyone else is trying to get a similar shot.
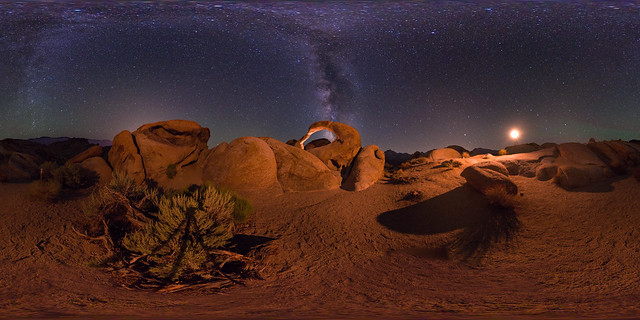
For this shot, I got down low, below the arch and aimed my camera upwards. Perhaps the easiest way to see the scene as I did – is to check out my 360 photo I took below.
For this shot I used two LED light panels to light the scene. One set off to the right which you can see in the 360 photo and another laying on its back inside the arch. For both LED panels I wrapped them in a white t-shirt and lowered their intensity to its lowest setting. After that I fired off 5 shots focused on the sky and 3 more focused on the arch which I could user later to focus stack.
EXIF Information
Post Processing
This shot, like all of my Milky Way shots required a lot of post-processing. I would estimate it took me between 6-8 hours. I edited it as a series of many other photos so as I got going, it started to go quicker. Unlike most of my other photos, I created an 8 video series of how I created this which you can check out on Youtube – https://www.youtube.com/watch?v=mYnX9sc0AAw&index=1&list=PLUZk6cRYiDTOuQRFlKHvU-MN3v-HiO1UJ
- Starting out, I created a neutral white balance in Lightroom
- I then did manual exposure blending Photoshop
- After that I did focus stacking
- Then, created a smart object for the ground and sky and editing in Adobe Camera Raw
- From there I removed color noise
- Added a high pass filter to the stars
- Removed chromatic aberations form the stars
- Cleaned up fringing
- Added adjustment layers such as levels, saturation, color balance & exposure
Overall, it’s a photo that I’m really proud of, and happy I ha to chance to shot this iconic location.
Software Used
- Lightroom
- Photoshop
Techniques Used
- Exposure Stacking
- Focus Stacking

