
Neal Grosskopf
The Trona Pinnacles
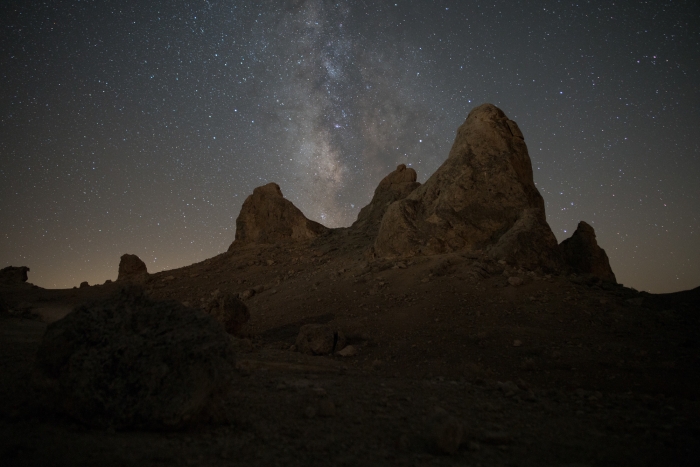
Before & After
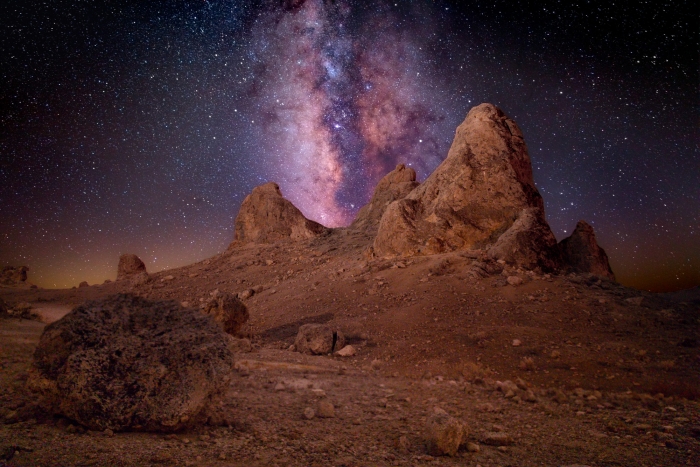
While I’m not from California, the Trona Pinnacles seem like a very popular location for night sky photographers in the area. I was lucky to be able to visit them (and the Alabama hills) during my trip out to LA last fall and I’ve finally finished culling and processing my 1,500 photos from the trip. Here’s one of my favorite compositions from that outing.
Location
The Trona Pinnacles are located in the middle of nowhere and were a 2-3 hour drive from my hotel at Joshua Tree National Park. I did a day trip up to Alabama Hills the day before and stopped by the Trona Pinnacles during midday to familiarize myself with the area. It was a scorching 100 degrees out in September and there wasn’t any shade to hide from the sun.
Probably the worst part about visiting the Trona Pinnacles is the gravel road leading in to them. It’s about a 30 minute drive (if you’re driving safely) down a bumpy pothole ridden road. It was even worse leaving at night when it was dark as I was afraid I’d not see a pothole in time and get stuck. Fortunately I had driven the road 3 times before that during my scouting and the 2nd drive in.
Once at them, you’ll see the large pillars of rock rising up offering almost unlimited compositions. There is one field of pillars about 200 yards from the bathrooms which is where I decided I wanted to take my photos. I also drove around the loop to pick out some secondary compositions in case there were other photographers in my area. I then came back the next day with my wife during sunset to get some pictures while she read a book in the car for the next couple hours (I love my wife!)
Composition
Having scouted the area out during daylight, I immediately knew where I wanted to shoot so I tried to strategically park the car in the spot so nobody would drive up to the area and mess up a photo. I was constantly paranoid about other photographers showing up seeing as it’s a popular place. I find nighttime photography to be extremely difficult when other people are around!
Despite my worries I only saw 2-3 cars pull in during the nighttime and we all respected one another. In fact one women went out of her way to not accidentally shine lights in my area the entire time. As I was leaving I thanked her letting her know, that she’s probably my favorite photographer I’ve ever shot with (lol) and I never even talked to her!
Back to this photo – as I was wrapping up sunset I started picking out some shots with foreground subjects. I found a lot of rocks about this size so I positioned that in my shot. The wind started to really pick up, perhaps 20 mph and it was blowing sand around like crazy. Because of this I had to leave my one lens on for the entire shoot which is something I don’t usually do. I also wrapped the entire lens mount in a t-shirt to further try to protect it as I was having flashbacks of going to the beach and getting sand in my gear and it never coming out again.
I then recalled this composition from earlier and got it setup. I also setup my LED light and had to move it several times to get the lighting how I wanted it. As you can see in the before photo, I really didn’t get it right and had to mostly post-process the light into the photo.
I then fired off a series of shots focused on the foreground and another 5 shots focuses on the stars so I could focus stack these later.
EXIF Information
Post Processing
Like a lot of my night sky photos lately, these took a long time to process. I would estimate each of the four photos in this series took 5 hours each. The later ones were less time as I got into the flow of things. It starts in Lightroom by getting the white balance correct. Then I exposure stacked them manually in Photoshop. After I blended the focus stacked images together. Next, I created a smart object for the ground and another for the sky and made some tweaks to those. After that I removed color noise from the ground and then remove star color using the color blend mode and a gaussian blur. After that I did a lot of defringing on the photo and finally made my mask for the sky and the ground.
I also tried a new technique for this series of photos by using something called star minimization. This seems counter intuitive as it removes stars or makes them less bright, but it gives more emphasis to the Milky Way as its gets crowed with stars.
The nice thing with these desert shots is there’s no trees to have to mask around. The western photographers in the US have it really easy as they only have to mask around rocks. Us east of the Mississippi photographers have to deal with that pain in most of our shots!
Finally, I adjusted the photo with probably 30+ adjustment layers such as color balance, levels, exposure, saturation and hue and saturation.
Thanks for reading!
Software Used
- Lightroom
- Photoshop
- Raya Pro
Techniques Used
- Exposure Stacking
- Focus Stacking