
Neal Grosskopf
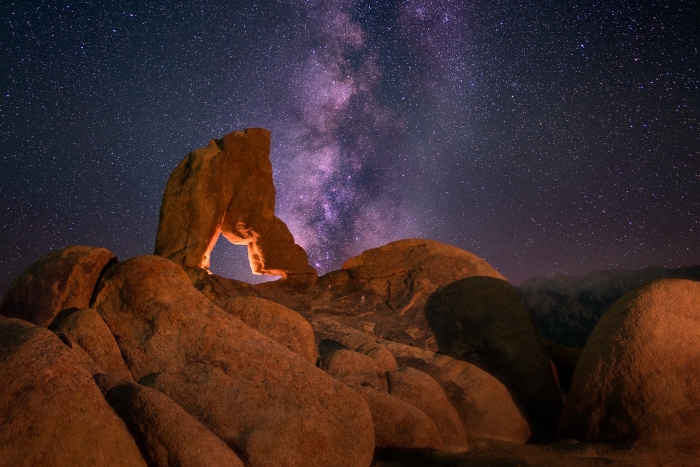
Lady’s Boot Arch – Alabama Hills, CA
Before & After
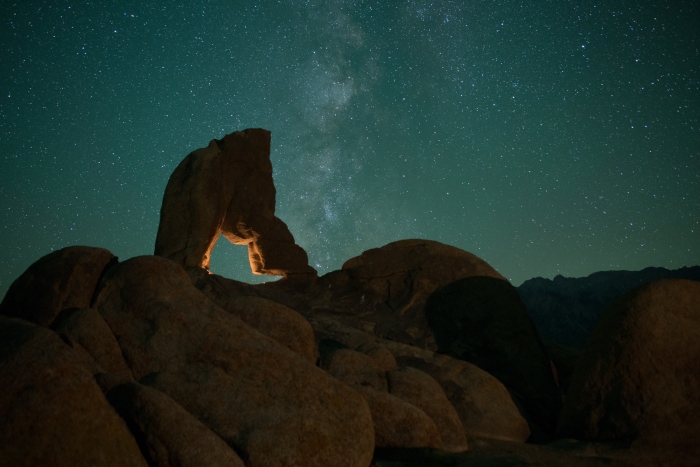
Here’s what I consider to be one of my best processing jobs of the Milky Way so far after taking photos of it for the last year and a half. The arch in the photo is Lady’s Boot Arch located in the Alabama Hills area of California during a vacation out there this year. Two LED video lights were used to light up this scene. One was setback about 20 feet dimmed very low with a t-shirt wrapped around it. Another was placed inside the arch facing upwards with a t-shirt wrapped around it as well. No rattlesnakes were encountered fortunately while taking this photo, haha although I did stumble upon a Black Widow Spider the next day at Joshua Tree National Park.
I went through a great deal of trouble to get this photo. My wife and I planned a vacation out to Los Angeles last year and I wanted to use half of the trip for visiting the desert. We stayed in 29 Palms near Joshua Tree National Park, but I spent most of the trip 4 hours north at the Alabama Hills and Trona Pinnacles. I did 8 hours of driving this day to visit the Alabama Hills and ended up getting home around 4am! One could easily spend several days in the Lone Pine region of California. The Alabama Hills are kind of like a mini-Arches National Park, but with many less visitors.
Location
Lady’s Boot Arch is located in the Alabama Hills BLM area nearby Lone Pine, California. I had originally scouted the location during the day which was a good idea as I don’t think I would have found it at night as it’s a little bit of off trail hiking. The easiest way to way it, is to find the first campsite off the road it’s on, then head in from there for maybe 100 yards.
I also had it marked on my phone so I could use GPS to locate it, but even then it can be hard to find the exact rock at night regardless of how close you are. For instance, it took me 20 minutes to find Eye Of Alabama Arch during sunset because, unless you’re at a certain angle where you can see the sky through the arch, it just blends in with the rest of the rocks in the area. When I arrived there was a couple who were both photographers shooting it, but they were wrapping up. I had spent the last 2 hours shooting Mobius Arch so we sort of traded arches for the night.
Composition
Hard to believe, but I only took four different compositions of this arch while there. It was getting late and I had spent all my time at Mobius Arch which I couldn’t believe I didn’t have to fight off any other photographers at that arch earlier so I really took advantage of it.
Since it was mid-September, the Milky Way was already beginning to set at this point so most of my shots, I tried to get the Milky Way near the arch. At Mobius Arch, I was able to get the Milky Way to actually be inside the arch which was really cool! I haven’t seen many photos of that exact angle online so far. Lady’s Boot Arch is much smaller so even if I got the Milky Way inside the arch, you wouldn’t be able to see much of it.
Like I mentioned earlier, I used two LED lights to illuminate the arch. One was set on a tripod about 20 feet back on it’s dimmest setting. I also wrap a folded t-shirt around the light to dim it even more as with long exposures the light, even on its dimmest setting tends to overexpose things too much. It’s important to have this light offset from your camera a ways so as to create some shadows and depth in the photo. If you had it right next to your camera it would make the whole scene very flat looking.
Next, I took my other LED light, laid it on its back and set it inside Lady’s Boot Arch. I also wrapped a folded t-shirt around this LED light. Since this light is so close to the rock it usually requires even more dimming so you don’t overexpose the inner part of the arch.
After that, I took my Rokinon 24mm f1.4 lens, aimed it at the arch and fired off 5 shots of the sky. I then re-focused and fired off 3 more shots focused on the rocks which I could use these two stacks later to focus stack the scene. I frequently notice other photographers forget to focus stack their night time shots and I figure, if I got on a plane, flew 1,000 miles and then drove another 12 hours to a location, I might as well get everything in focus and decide later if I want to use both.
EXIF Information
Post Processing
Like most Milky Way shots, this required a great deal of post-processing. Originally my white balance wasn’t the greatest with a very green tint. Earlier in the night I had set my white balance on my camera to 3800k which gave my shots a nice blue tone. For whatever reason when I got in my car and drove to the next arch that changed to green. In Lightroom I changed the white balance, removed all sharpening and color noise correction then sent the 8 RAW files over to Photoshop where I did all the other editing.
From there, I stacked the foreground images, converted to a smart object applied a median blend and then focus stacked them. The median blend removes a lot of the noise and lets you process the photo more than if you hadn’t done that.
For the sky, I manually aligned the 5 images and repeated the process above. After that I created a mask to blend the sky and foreground together for the base image which I would edit going forward.
I’ve refined my Milky Way editing process each time I create a new photo and I think I finally have it pretty solidified. I put all my pixel based layers at the bottom and all my adjustment layers at the top. This allows me to go back to the pixel layers later and tweak them, otherwise once you jump a new pixel layer above adjustment layers it’s hard to go back and make changes.
Here’s a summary of the edits for this photo:
- Usually I make these edits in Lightroom, but this time I decided to do everything in Photoshop. I created two smart objects, one for the ground and one for the sky, then edited them in Adobe Camera Raw.
- I made a mask for the sky and applied that to keep the two smart object changes separate.
- Next I applied a high pass filter to the sky with a radius of about 3px. This really makes the stars ‘pop’.
- After that I removed chromatic aberration from the stars by applying a gaussian blur of about 15px to a sky layer, then set that layer’s blending mode to ‘color’ This makes all the stars pure white which really helps. I recently learned this and the high pass trick and together these are sort of the secret sauce with wide field astrophotography.
- Then I applied an orton effect to some of the image.
- After that I learned a new trick from the Nick Page video series to remove halos which were pretty bad in this image originally.
- Typically I would create a new pixel layer and use the dodge and burn tools for the Milky Way, but this time I used a series of levels layers for it. Each layer targeted a different level such as dark, mid and bright. Then I painted those in.
- After that I did a bunch of smaller tweaks to different areas.
A summary of the layers in the PSB file:
- 16 adjustment layers
- 10 pixel layers
- 2 smart object layers
Overall processing time was roughly 6 hours.
Software Used
- Lightroom
- Photoshop
- Raya Pro
Techniques Used
- Exposure Stacking
- Focus Stacking